

Selenium Grid for Beginners: Improve Your QA Process in 9 Steps
The market demands fast releases and high product quality. As a result, in many situations, you need to implement test automation. But how can you manage this when you have a very limited budget? In cases where it’s necessary to execute tests across different browsers, their versions, operating systems, and combinations of all of the above, a perfect solution can be Selenium Grid. It provides you with the capabilities to do this quickly due to the possibility of parallel execution.
Our friends and brilliant professionals at Zebrunner wrote this collaborative post to bring you a beginner’s guide on how to get started with Selenium grid.
Thank you – Vadim Delendik, CTO at Zebrunner, Hanna Sukhadolava, lead test automation engineer, and Viktoryia Kapinus, test automation engineer for sharing your knowledge with the community.
What is the Selenium Grid?
Let’s start with the theory.
The Selenium project is an open-source automation testing framework designed for web applications. It equips users with a suite of tools and libraries, enabling the creation of scripts to automate web browser interactions.
The Selenium project has several essential components: WebDriver, IDE, and Grid.
WebDriver. If you’re getting started with desktop or mobile website test automation, you’ll work with WebDriver APIs. WebDriver leverages browser automation APIs offered by vendors to emulate a genuine user experience.
Since it doesn’t require integrating with your application code, it’s non-intrusive, allowing you to test the live application.
IDE (Integrated Development Environment). IDE is a user-friendly Chrome, Firefox, and Edge extension for creating Selenium test cases. It records your browser interactions using Selenium commands, making test case development efficient and a great way to learn Selenium scripting.
Selenium Grid. Selenium Grid enables running test cases on different machines and platforms. Test case execution is initiated locally, and Grid automatically handles remote execution. This is invaluable for running tests across various browser and OS combinations after developing WebDriver tests.
Investing time in learning Java for Selenium testers can significantly improve the efficiency and effectiveness of your QA process.
Commercial versions of Selenium Grid offer testing teams various useful artifacts such as logs, screenshots, and videos. This simplifies the debugging process. In contrast to the open-source Selenium Grid version, commercial tools ensure a quick and straightforward testing setup. You won’t spend hours configuring the tool or exploring its features. Once you sign up, you receive a grid URL and credentials, and start cloud-based testing immediately. As your product grows, you’ll need to expand your test automation efforts. Commercial Selenium Grid versions offer unlimited scalability options. Implementing Selenium Grid can enhance your QA process by enabling parallel test execution. You can easily add more nodes to the grid to execute additional tests. You can find more information about this here.
Selenium Grid Architecture
Here’s an overview of Selenium Grid’s architecture:
Hub
This is the central component of Selenium Grid. It acts as a master server that controls the distribution of test execution to available nodes. Test scripts are sent to the Hub, and it delegates the execution to appropriate nodes based on the specified configuration and requested capabilities. Next, the hub receives test results from the nodes and forwards them to the user.
Nodes
Nodes are the machines where tests are executed in parallel. Each node registers with the Hub and informs it about its availability and the browsers it can run tests on. Nodes execute test scripts received from the Hub using the WebDriver API. Multiple nodes can be set up on various machines, allowing parallel testing across different browsers, operating systems, or devices.
WebDriver instances
Each node typically runs multiple WebDriver instances, each associated with a specific browser or platform. The Hub decides which node to send a test to based on the desired capabilities defined in the test script. This ensures that tests are executed on the most appropriate nodes with the required configurations.
Test script execution flow
The user initiates a test through the Hub by specifying the desired browser and platform configurations. The Hub forwards the test to an available node with matching capabilities. The node executes the test using the specified browser, interacting with the target web application. Test results, including pass/fail status, are reported back to the Hub. The Hub collects and aggregates test results from all nodes and provides them to the user for analysis.
9 steps to start with Selenium Grid
The proper setup ensures successful operation with Selenium Grid. If configured incorrectly, it will not work properly. This process involves setting up a testing environment, configuring nodes, and running test scripts in parallel across different browsers and platforms. Here’s a step-by-step plan with clear explanations to help you get started.
Step #1. Install prerequisites
Before setting up Selenium Grid, install the prerequisites, which typically include the following:
1. Java Development Kit. Selenium is a Java-based framework, so you need to have the JDK installed. You can download the latest version of JDK from the Oracle website or use open-source alternatives like OpenJDK.
2. Selenium WebDriver. You’ll need to have Selenium WebDriver set up. This is a crucial component for writing and running your automation scripts. You can download it from the Selenium website.
3. Web Browsers. If you plan to test your applications on different browsers, you’ll need to have them installed. Common choices include Chrome, Firefox, and Edge.
4. WebDriver Language Bindings. Depending on your programming language preference (Java, Python, C#, etc.), you’ll need to set up the corresponding WebDriver language bindings. For example, if you’re using Java, you should have the Java WebDriver bindings.
5. IDE or Code Editor. You’ll need a code editor or an Integrated Development Environment (IDE) to write your Selenium scripts. Common choices are Eclipse, IntelliJ IDEA, or Visual Studio Code.
6. Setting Up System Variables. To ensure your Selenium and WebDriver setups work seamlessly, you’ll need to configure system environment variables. This usually involves adding the paths to your Java, WebDriver, and Selenium Server executables to your system’s PATH variable.
7. Browser Drivers. WebDriver requires browser-specific drivers to interact with web browsers. You’ll need to download the appropriate browser drivers (e.g., ChromeDriver, GeckoDriver for Firefox) and configure them.
8. Network Configuration. If you plan to use multiple machines in your grid setup, ensure they are networked properly and can communicate with each other. This may involve configuring firewall settings and ensuring proper network connectivity.
Step #2. Download Selenium Server (Grid)
Download the Selenium Grid JAR file from the official Selenium website.
Step #3. Setting up the Hub
- Create a new directory for your Selenium Grid setup. This will be your Grid project directory.
- Place the Selenium Server JAR file (selenium-server-<version>.jar) in your project directory.
- Open a command prompt or terminal and navigate to your project directory.
- Start the Hub by running the following command:
java -jar selenium-server-<version>.jar hub - The Hub will start and run on the default port 4444. You can access its web interface by opening a web browser and going to http://localhost:4444/
Step #4: Setting up nodes
On separate machines (physical or virtual) or even on the same machine if you plan to test with multiple browser configurations, you need to set up nodes. The process is similar to setting up the Hub:
- Create a new directory for each node.
- Place the Selenium Server JAR file in each node’s directory.
- On each machine, start a node by running the following command:
java -jar selenium-server-<version>.jar node –hub http://<hub-ip>:4444
- Replace <hub-ip> with the actual IP or hostname of the machine running the Hub.
To start a Node on the same machine where the Hub is running, use simplified command:
java -jar selenium-server-<version>.jar node
- The node will register with the Hub and be ready to accept test scripts for execution. Connected nodes and active sessions can be viewed by accessing http://<hub-ip>:4444/
Step #5. Write test scripts
To write test scripts that will run on the Selenium Grid, we have to specify a RemoteWebDriver object with pointing to the Hub’s URL (http://<hub-ip>:4444). In order to customize the configuration, it’s necessary to specify desired capabilities such as browser, its version and platform.
Below is an example of instantiating a remote WebDriver object pointing to the remote web server running the tests on Chrome browser and MacOs platform:
ChromeOptions chromeOptions = new ChromeOptions();
chromeOptions.setPlatformName(“Mac”);
WebDriver driver = new RemoteWebDriver(new URL(“http://<hub-ip>:4444”), chromeOptions);
driver.get(“http://www.google.com”);
driver.quit();
Step #6. Run tests on Selenium Grid
Before tests execution, make sure:
- The hub/nodes are started and nodes are added successfully to the hub;
HUB:

NODE:

- You can verify connected nodes with available stereotypes in the Selenium Console by accessing http://<hub-ip>:4444. The correct address can be found in the Hub logs when Selenium Grid is started:

- Valid hub URL is configured in the RemoteWebDriver object (step #5);
- Desired capabilities are valid according to started nodes/stereotypes (step #5).
Next, execute tests.
Tests are usually written using testing frameworks like TestNG. In this scenario, you can execute them directly from the Integrated Development Environment (IDE) for individual classes or test methods, or create a testng.xml file to run multiple tests collectively as a suite. Another advantage is executing tests, classes, or methods in parallel using a specified number of threads. Selenium Grid further facilitates the validation of the product across various browsers and platforms.
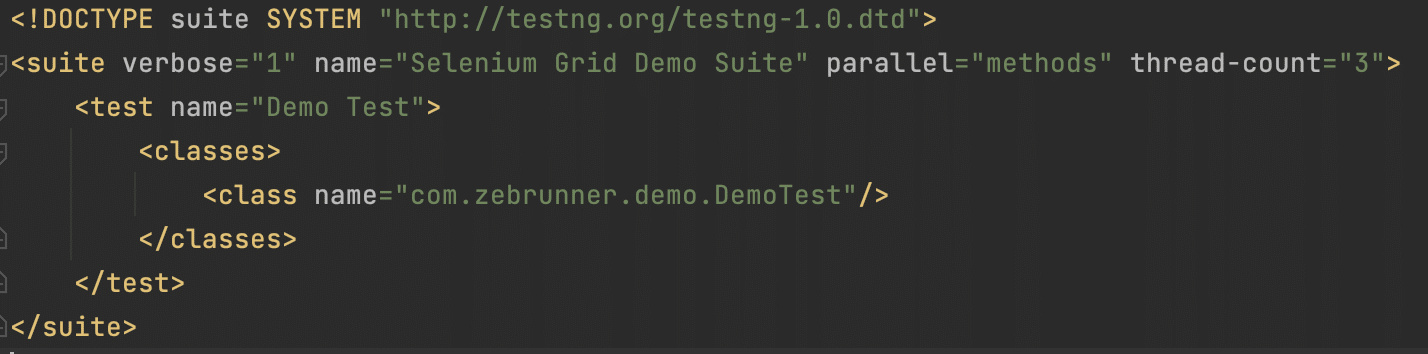
In the example above, we will execute test methods using three threads in parallel. Each test method has its unique desired capabilities for execution, targeting Chrome, Firefox, and Safari browsers.
Step #8. Monitor test execution
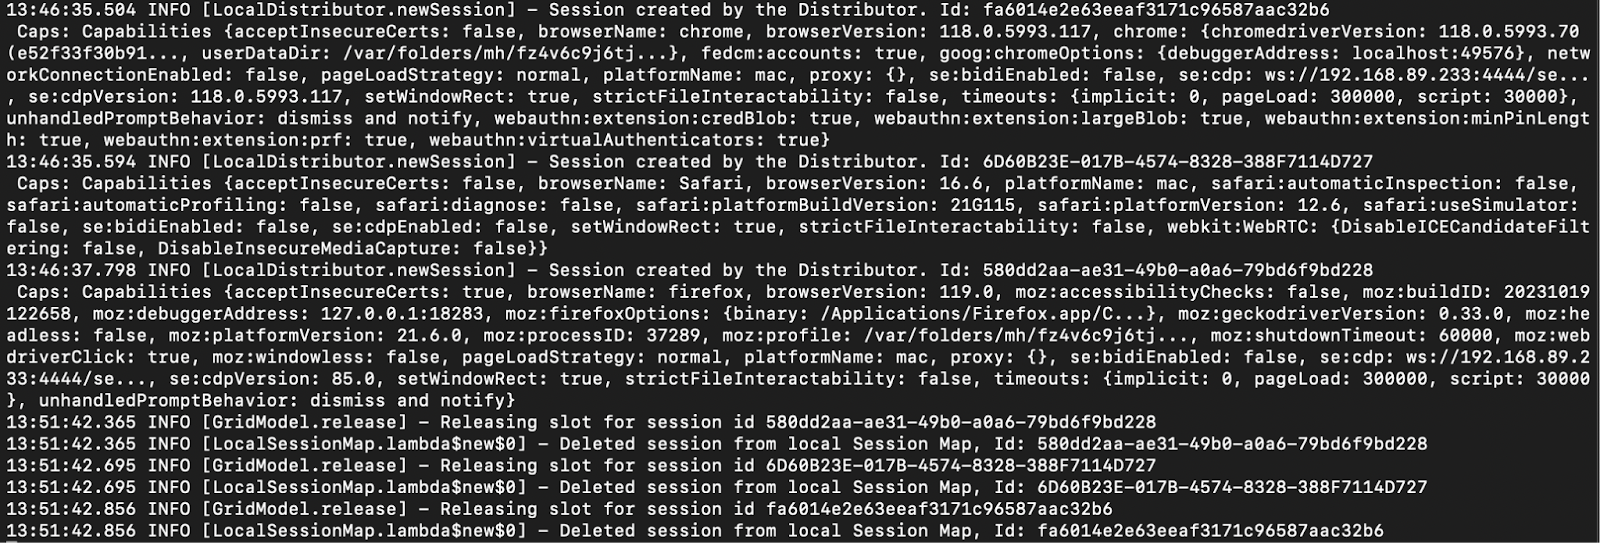
While tests are running, you can monitor session status, concurrency, and queue size by accessing the Hub’s web interface: http://<hub-ip>:4444/ui#/sessions

Or creation/removing sessions and their capabilities via logs in the terminal:
Step #9. Review test results
Congratulations! You have successfully executed the tests, now it’s time to review the results.


