

Selenium Python Tutorial for Beginners
In today’s rapidly evolving software development landscape, the dependability and functionality of web applications are really important. When used in conjunction with Python, Selenium presents a sophisticated answer to many urgent issues faced in the test automation area. It effectively tackles the need for swift, consistent, and precise testing of web applications across various browsers and environments. Utilizing Selenium enables QAs to streamline the testing process by automating it, considerably cutting down the time and manual labor involved in monotonous test scenarios. This automation accelerates the development process and substantially improves the software’s quality and dependability, ensuring web applications perform reliably in diverse situations.
This article takes a deep dive into the synergy of Selenium and Python, revealing how it revolutionizes the process of test automation. We will navigate through the fundamentals of Selenium, providing practical samples and guidance on creating your first script with Selenium and Python. We’ll focus on locating basic elements on a webpage and interacting with them effectively. Understanding various
Selenium Locators is crucial for effectively interacting with web elements during automation. This hands-on approach is designed to benefit both beginners and experienced QAs, offering a clear pathway to mastering the fundamentals of Selenium and Python in web automation. You will thoroughly grasp how Selenium with Python is transforming the landscape of software testing.
Introduction to Selenium and Automated Testing
Let’s start by understanding the historical perspective of Selenium and its evolution, as well as the importance of Selenium for test automation.
Selenium: A Historical Perspective and Its Growth
Selenium, conceived by Jason Huggins in 2004, has emerged as a pivotal element in web automation technology. Originally thought as a tool for internal browser automation, it swiftly transitioned to an open-source platform, garnering widespread acceptance due to its versatility and robustness.
Selenium’s evolution from its initial JavaScript-focused Selenium RC to the comprehensive Selenium WebDriver in the Selenium 2.0 suite marks its growth. Presently, Selenium’s support extends to multiple languages like Python, Java, C#, and Ruby, and it is compatible with various browsers and operating systems, giving it a status as a preferred web automation tool. For a comprehensive comparison between using Selenium with Java or Python, refer to our detailed guide on Selenium with Java or Python.
The significance of Selenium in web automation comes from its capability to mimic human interactions with web pages, from clicking buttons to entering data and retrieving information. It excels in automating intricate web applications and executing tasks with precision and repeatability, crucial for various testing types like regression, functional, and load testing.
Selenium’s adaptability across different browsers and operating systems further bolsters its utility, empowering QAs to ensure consistent web application functionality across diverse platforms.
Selenium in the Automated Testing Landscape
Among a variety of web automation tools, Selenium distinguishes itself in several aspects. Contrary to proprietary tools, Selenium is an open-source, cost-free solution, making it more accessible to a broad spectrum of QAs and smaller enterprises. It surpasses other proprietary tools in language support and browser compatibility. Additionally, Selenium benefits from a vibrant community that contributes to a wealth of resources and consistent updates, keeping it in line with the latest web technology trends.
Applications and Suitability
Selenium’s utility and importance are demonstrated through its practical applications in a range of web application testing scenarios:
-
- Functional Testing: Imagine checking every web application feature to ensure it works as intended. Selenium automates this process, efficiently validating each function, from user logins to data processing.
-
- Regression Testing: After updates or changes, confirming they haven’t disrupted existing functionalities is crucial. Selenium automates these checks, seamlessly ensuring that new code doesn’t introduce errors into previously stable features.
-
- Load Testing: Consider a scenario where a web application must perform under heavy user load. Although Selenium itself doesn’t conduct load testing, it can be integrated with tools like JMeter to test how an application behaves under stress, ensuring stability.
-
- Cross-Browser Testing: Web applications must work consistently across different browsers. Selenium automates this process, testing compatibility and performance across multiple browsers, thus guaranteeing a uniform user experience.
-
- Data-Driven Testing: When testing involves various data inputs, Selenium is able to run the same scenarios with different data to validate multiple outcomes effectively.
These practical examples underscore Selenium’s versatility in testing web application testing, highlighting its critical role in ensuring software quality and reliability. Relative locators in Selenium 4 provide a more flexible way to locate elements based on their position relative to other elements.
Selenium’s progression from a rudimentary tool to an internationally recognized web automation framework underscores its pivotal role in test automation. Its compatibility with diverse programming languages, browsers, and operating systems, coupled with its capacity to enable efficient and accurate automated testing, positions Selenium as an essential instrument in contemporary software development. Selenium’s adaptability and scalability make it useful for a variety of test automation requirements. Utilizing assert methods in Selenium enhances the reliability of your Python-based automation scripts.
Environment Configuration for Automated Testing
Embarking on automated testing with Python and Selenium requires an initial setup to create an efficient development environment. This concise guide will walk you through installing Python and Selenium WebDriver, and how to establish a test environment with an IDE such as Visual Studio Code.
Python
Python’s ease of use and readability makes it ideal for web testing.
To install Python:
-
- Downloading Python: Navigate to www.python.org and download the most recent Python version for your OS. Prefer Python 3.x for its updated features and support.
-
- Installation Process: Execute the downloaded file. Remember to select “Add Python 3.x to PATH” before finalizing the installation, enabling command line access.
-
- Confirming Installation: Verify Python’s installation by running the below command in the command line tool of your OS:
| python –version |
-
- Pip Update: Update Python’s package manager, pip, by executing the below command:
| python.exe -m pip install –upgrade pip |
Selenium WebDriver
Here is how to set up Selenium WebDriver for browser automation:
In the command line, run the below command to install it:
| pip install selenium |
Visual Studio Code
Selecting a powerful IDE is crucial for script development. For this article, we will use Visual Studio Code.
To integrate with Visual Studio Code (VS Code), follow these simple steps:
-
- Install VS Code: Download and install Visual Studio Code from its official website www.python.org.
-
- Add Python Extension: In VS Code, go to Extensions and install the Python extension. This extension enhances your coding experience with features like IntelliSense and debugging.
Following these streamlined steps will result in a well-integrated setup for Python and Selenium WebDriver within Visual Studio Code, ideal for creating, executing, and debugging automated web tests, thus ensuring web application functionality and stability.
Basics of Selenium with Python
The integration of Selenium with Python has become a crucial skill set for professionals in software testing and web automation. This section delves into the foundational aspects of using Selenium with Python, focusing specifically on understanding the WebDriver and creating your first Selenium script.
Understanding WebDriver
Selenium WebDriver is a fundamental component of the Selenium suite. It’s a web automation framework that allows you to execute tests against different browsers, like Chrome, Firefox, and Internet Explorer. WebDriver directly interacts with the web browser and uses its native compatibility to automate.
Unlike its predecessor, Selenium RC, which required a server to interact with the web browser, WebDriver interacts directly with the browser applications. This direct interaction is achieved through a driver specific to each browser. Each driver understands the browser’s proprietary logic to control it, making WebDriver faster and more efficient.
WebDriver’s architecture is quite straightforward. It involves your script, written in Python, which communicates commands to the browser-specific driver. The driver then executes these commands within the browser and returns the results back to your script. This interaction facilitates actions like navigating to web pages, selecting elements, and inputting data.
First Selenium Script
Let’s write a basic script to open a web page using Python and Selenium WebDriver. For this example, in this article, we are going to use Google Chrome.
In this article, we are going to do some automations in a web page created by me specifically for this article, that is hosted in “https://paulocoliveira.github.io/mypages/jobapplication.html“.
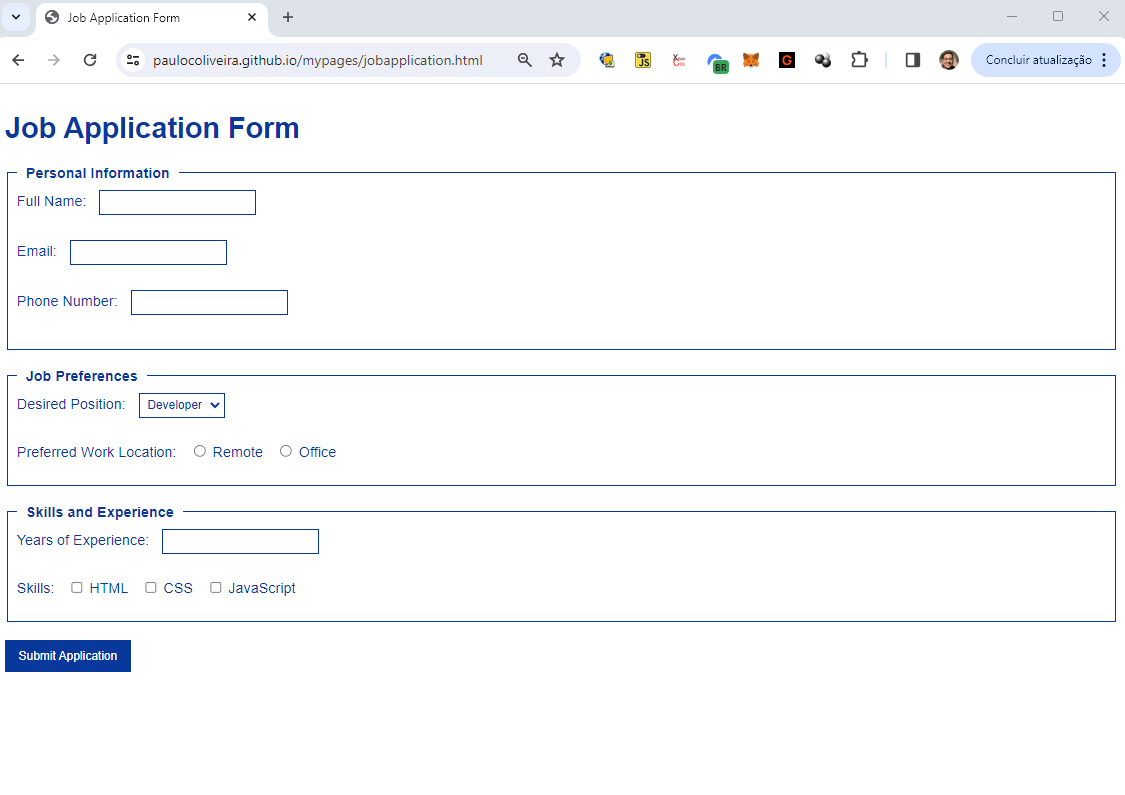
It is a Job Application Form, without any backend or database, just a frontend that enables us to locate and do some interactions with different web elements, that is the main goal of this article.
Here you have the basic script created:
Finally, driver.quit() closes the entire browser session. It’s important to close the session after automation tasks are completed to free up system resources. Without this line, the browser window will stay open even after the script has finished executing.
You can execute this script simply by running the command:
| python your-script-name.py |
After running, you will get the below result:

If everything is set up correctly, you will see a Chrome window opening, navigating to the Job Application Form, printing the title of the page in your console, and then closing the browser.
Overall, this script demonstrates a simple Selenium WebDriver usage. This is a fundamental example of web automation using Selenium with Python.
Locating Elements in Selenium with Python
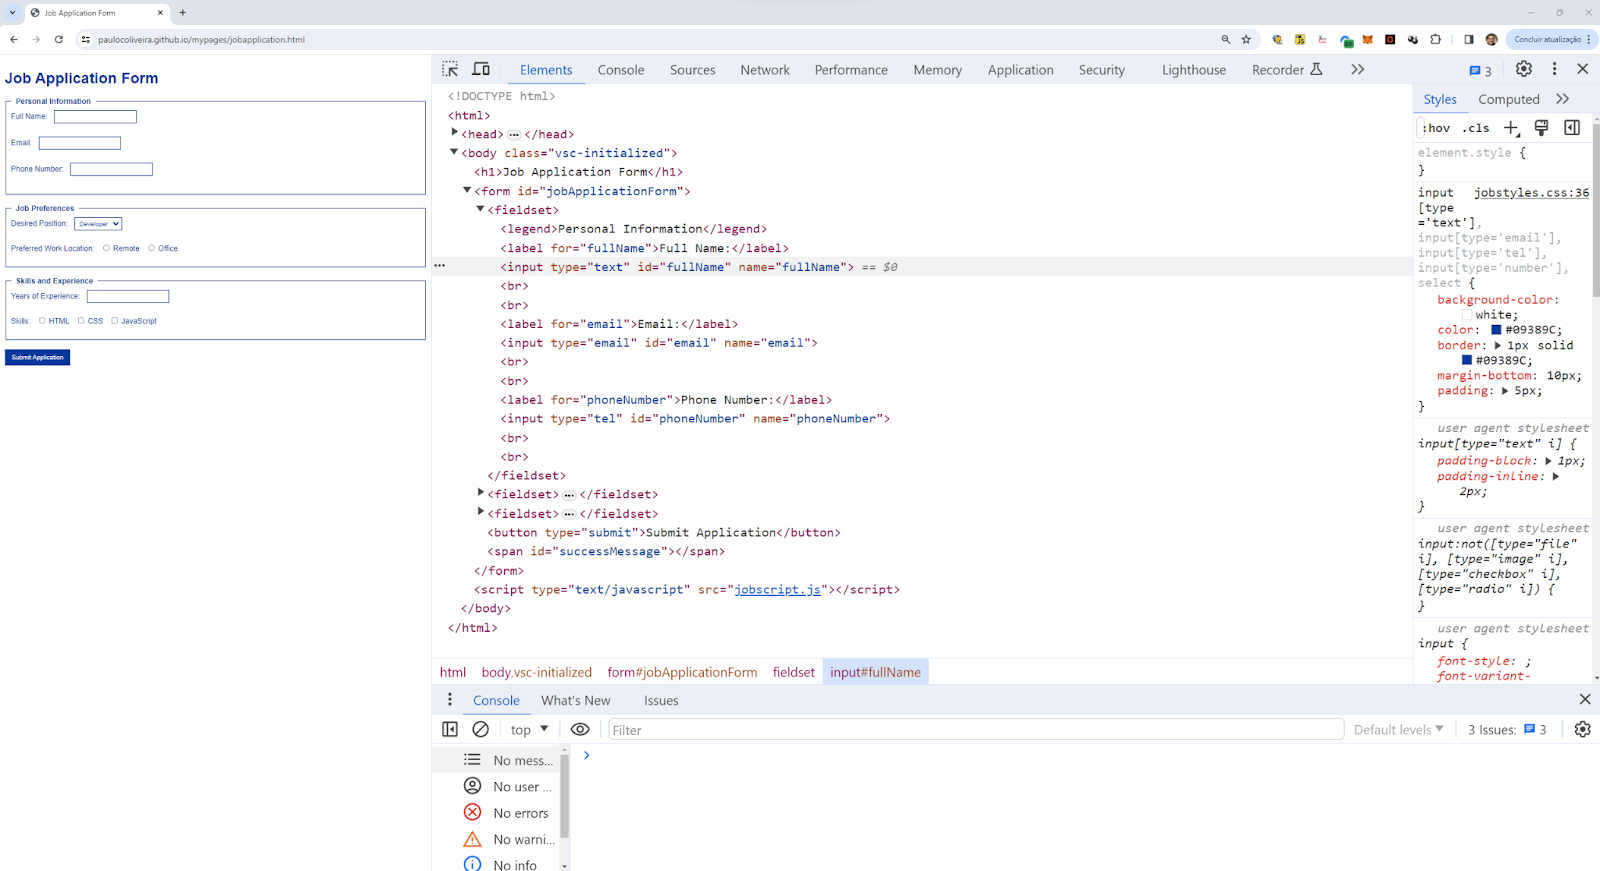
Understanding how to locate elements is a fundamental aspect of using Selenium for web automation. In this section, we’ll explore different types of locators and demonstrate their use with practical examples, using the HTML content of the Job Application Form web page.
Introduction to Locators
In web automation with Selenium, locators are used to find and interact with elements on a web page. Locating elements in Selenium involves finding the HTML elements on a webpage that you want to interact with. It’s important to ensure these elements are stable to avoid encountering a StaleElementReferenceException.
The most common types of locators include ID, XPath, and CSS selectors. Each type has its unique way of identifying elements, and choosing the right locator depends on the specific scenario and the structure of the web page.
-
- ID: The simplest and most efficient way to locate elements. Ideal when the element has a unique ID.
-
- XPath: A powerful language used for navigating through elements and attributes in an XML document. XPath can be used for both simple and complex HTML structures.
-
- CSS Selectors: Used to select elements based on their style. While similar to XPath, they can be more readable and better for performance in some cases.
Practical Examples
To locate an element on a web page, you need to right-click on the element you want and then select the Inspect option.
Using the provided HTML content of the “Job Application Form,” let’s demonstrate how to locate various elements using these three locator types.
Example 1: Locating by ID
The form contains several elements with unique IDs, such as the ‘fullName’ input field.
Here’s how you can locate this element using its ID:
Example 2: Locating by XPath
XPath can be used to locate elements with more complex queries. For instance, to find the ‘Submit Application’ button.

Here’s how you can locate this element using its XPATH:
This XPath looks for a button element with the text ‘Submit Application’.
Example 3: Locating by CSS Selector
CSS selectors are useful for finding elements based on their styling. For example, you can locate the email input field using its CSS selector.

Here’s how you can locate this element using its CSS selector:


